Dit is het doosje met choladestaafjes waar ik de doosjes omheen gemaakt heb.
This is the box with chocolates I made the gift box around.
This is the box with chocolates I made the gift box around.
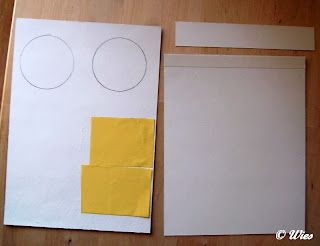
Dit zijn de materialen die ik gebruikt heb.
These are the materials I used.
These are the materials I used.
Links heb ik twee keer rond de koker getekend. Ook zijn er twee stukjes dubbelzijdig tape op het karton geplakt.
Het rechter karton om de koker heengevouwen,1 cm plakrand bijgerekend en de rest afgesneden.
On the left : I draw two times around the tube. I also added two pieces of dubble sided tape on the cardstock.
The cardstock on the right side is folded around the tube with 1 cm extra to stick the tube together.
Een van de rondjes uitgesneden met een plakrand van 1 cm (met een cirkelsnijder)
In deze plakrand inkepingen maken.
Dit is het rondje voor de bodem.
De andere twee heb ik 2 mm groter dan de bodemcirkel uitgesneden, waarvan 1 uit het karton met de tape.
Ook nog een strook (rechts van de rondjes) van 3 cm uitgesneden die om deze rondjes heenpast.
Dubbelzijdig tape op de rand en links en bovenaan op het grote karton geplakt.
In de plakrand van de strook ook inkepingen maken.
One of the circles is cut out with an edge of 1 cm extra.
In this edge you make notches.
The other two circles are cut out 2 mm bigger than the circle for the bottom. One of them is cut out the part of cadrstock with adhasive tape.
I also cut a strip of 3 cm that fits around these circles.
Added dubble sided tape on the edge of the strip and on the left and upper side of the large piece of cardstock.
In the edge of the strip you also make notches.
Het grote stuk karton rond gevouwen en met de plakrand vastgemaakt zodat het een koker wordt.
The large piece of cardstock is folded round and glued together with the adhasive edge so it becomes a tube.
The large piece of cardstock is folded round and glued together with the adhasive edge so it becomes a tube.
De plakrand van het rondje met de inkepingen naar beneden duwen.
In de koker aan de rand bovenaan vastplakken aan de tape.
The adhasive edge of the circle with the nodges, are folded down.
Stick in the circle on the upper edge of the tube.
The adhasive edge of the circle with the nodges, are folded down.
Stick in the circle on the upper edge of the tube.
Helaas wat onscherp, maar zo ziet de bodem er dan uit.
This is the way the bottom looks like.
This is the way the bottom looks like.
De strook met inkepingen op één van de andere rondjes plakken en wel op die zonder tape.
The strip with nodges is glued on one of the other circles without the sticky tape.
The strip with nodges is glued on one of the other circles without the sticky tape.
Het overgebleven rondje met de tape in de deksel plakken zodat de plakrand niet meer zichtbaar is.
The remaining circle with the tape is glued in the cover, the nodges are not visible anymore.
The remaining circle with the tape is glued in the cover, the nodges are not visible anymore.
De doos / koker met deksel.
The tube with cover
The tube with cover
De versierde doos / koker.
Op deze manier kun je een cadeauverpakking maken om elk formaat koker.
On this way you can make a gift box around every size of tube.
On this way you can make a gift box around every size of tube.


mooie leuk tutorial.
BeantwoordenVerwijderenduidelijk uitgelegd!!
groetjes dora